Sunday, July 17, 2011

Roadtrippin'...

Do you know what the easiest way is to lose several of your brain cells at any given time?

Combine 40 hours (total) driving across the country + two small children + sunburned/grumpy husband.

Oh yeah. All I know is that I knit two pairs of socks. One on the drive down and the other on the drive home.

mansocksv1.6

One set for my FIL. It's my standard man's sock recipe. Hence the name of the socks...Man Socks v1.6. Here the socks are hanging out chez in-law cottage. Loughborough Lake is really beautiful and quite warm. Especially when you jump into it in a desperate bid to escape the mosquitoes that are the size of a QUARTER. A flippin' quarter, people.

businesssocks

And one set for me. This one was finished just as we pulled into Halifax. As you can tell, I ran out of yarn on the second sock. Grabbed the extra ball of yarn (doesn't everyone carry an extra ball of yarn with them when traveling?) and finished them off.

Actually, it's been a crazy crafty month.

Socks for Miss E.

bittyboo

And the package for the movie swap.

movieswap

plus

volturi

My partner's favourite movie is A Clockwork Orange. I couldn't bring myself to watch it. (There's a few scenes in there that I *know* would deeply upset me.) So I went with more iconic images in lieu of actual familiarity. Really enjoyed embroidering the project bag, it's been ages since I did anything like that. And the amigurumi Droog is my first amigurumi ever. I'm not sure that I'm very good at it...so it may be my last one too. Heh.

And finally...I had to repackage the majority of my stash. All of the space saver bags that I was using decided to collectively commit seppuku at the same time. So the stash went into rubbermaid boxes instead.

stash

When I look at this...the only thing that I can bring myself to think is:

"Gotta start knitting faster."

Tuesday, June 28, 2011

Humpbacks.

Not the whales. Or a particularly unfiltered google search result. Nah, nothing that exciting or racy, people. Although it does sound like an awesome title for an upcoming album from FOTC.


Just a pair of thrummed mittens that immediately elicited the following response from my lovely spouse.

"OOoooooeeeeiiiiiiiiiiiii.....miiiiiiiiittttteeeeeeeeennnnnnnnsssss...wwwwwiiiiiiiiitttthh....baaaaaaaaaaaaaaaarnnnnnaaaaaclessssss?"

humpback

Yeah.

I live with weirdos. Needless to say, I spent the rest of the night with the mittens on and making silly whale noises while we watched something goofy. Resident Evil movies, I think. These are the mittens that I started in May...not to get a head start on the upcoming winter. But because I was just. that. cold.

Other stuff:

I've been working on a package for a Favourite Movie swap. My partner's chosen movie was Clockwork Orange, which I refuse to watch. But it's iconic enough that some select Interwebz searching gave me some good ideas. Will post pics once the package is sent out.

And finally, a little bitty pair of socks for Miss E. In preparation for much chilly hiking during an upcoming holiday. Can you guess where we're headed?

bittyboo

Sunday, June 19, 2011

Peek-a-boo!

As promised, the tutorial on how to make a sneaky surprise project bag. In honour of Jai-chan...I decided to make this one with a hidden zombie surprise.

peekaboobagtutorial

Braaaaaaaaaaaaaaaaaaaaaaaaaaaaaaaaaaaaains...

Here's what you'll need to cut:

1 outer fabric into a rectangle (mine measured 13 inches x 18 inches)
1 inner fabric, also into a rectangle (13 x 18 inches)

peekaboobagtutorial

1 circle of outer fabric (I used a ribbon box that was 3 inches in diameter)
1 circle of inner fabric, same size
2 circles of fusible interfacing, same size as the fabric circles

peekaboobagtutorial

I can't emphasize enough how important it is to press your fabrics before cutting. I had to shave almost an inch off after pressing the outer fabric 'cause I was too lazy to press it before cutting...and it didn't match the dimension of the inner fabric after I pressed it. *sigh*

Also, keep that iron handy - you'll need to iron the interfacing to the circles.

peekaboobagtutorial

Comme ca. Trim the circles so that all the interfacing is even with the fabric. Your circles might shrink a little, but it'll be ok.

Next step, grab one of the rectangles. I worked on the outer first, but it's not important which one gets done first. I finished the edges on both of the long sides of the rectangle, but since the raw edges will be eventually hidden, you don't have to. I'm just weird that way. Sew the short sides of the rectangle together, right sides together. And you'll end up with a tube.

peekaboobagtutorial

Time to gather! Since it's not a big bag, I do this by hand. Just do a running stitch along the top, and gently pull on it to tighten the stitches together. You'll end up with something that looks like this.

peekaboobagtutorial

Grab the interfaced circle, and pin it on top of the right side of the gathered fabric. The more pins, the better.

peekaboobagtutorial

Now, you're going to be wrestling with the fabric for a bit. Just remember that sewing and alcohol are not a good mix. Sewing and swearing? Tends to go much better.

Sew a very short and wide zigzag stitch. I set my machine to 5 mm wide and .5 mm long. You're going to be appliqueing the circle to the bag.

peekaboobagtutorial

And after the pinprick punctuated swearing session?

peekaboobagtutorial

Voila. Now for the inner bag. If I'd been thinking things through before starting, I should have cut the inner fabric circle out of the cream coloured fabric. Oh well. I just sewed on a smaller circle for the zombie's head. If you were doing a ninja, you'd cut a small rectangle with rounded edges and sew it on.

peekaboobagtutorial

You're going to put in the safety eye now.

peekaboobagtutorial

Since the post of the safety eye is a little long, I like to trim it down a bit so that it doesn't poke through the bag. Some creative embroidery later...

peekaboobagtutorial

*snicker* Just so you know, french knots make excellent blood splatter.

Repeat the process of making the rectangle, gathering, pinning and applying the circle for the inner fabric.

peekaboobagtutorial

Action shot.

peekaboobagtutorial

And both bags.

Next, we'll be making the casing. Fold down the top edge of each bag about 1/2 an inch. Press into place. Don't forget to give the seams of the bags a quick press while you're at it. It really does make the finished bag look a million times better.

Flip the inner bag inside out and place it inside the outer bag, wrong sides together.

peekaboobagtutorial

Pin the edges of the two bags together, seams matching. Get ready for some topstitching!

peekaboobagtutorial

As you can see, I'm sewing *really* close to the edge. Maybe 2 mm away from the top.

Sew the bags together, leaving a small gap of about 1/2 inch between the beginning of the seam and the end of the seam. This gap will be where you thread the cord into the casing.

peekaboobagtutorial

Not the best picture, but I hope it gives you an idea. Next, sew another seam around the entire bag, a little less than 1/2 inch away from the top. (Within the 1/2 inch that you had folded and ironed down earlier.) This is the bottom of your casing.

Thread a ribbon or cord through the casing and you're done! Enjoy your very own peekaboo bag!

Monday, June 13, 2011

NINJAS!!!

Oh yes. I do love me some ninja action. They are easily my favourite character to play in Deadliest Warrior. Fast, quiet, nimble and handy with a garrote...my kinda assassin. Anyway. Onto the ninja goodies!

From my partner:

Ninjas

Filled with win, yes? Best part?

Ninjas

Ninja octopus stitchmarkers. Seriously. I love them beyond all reason.

And from me to my partner:

ninjaswap

More October Leaves mitts. LOVE LOVE LOVE this pattern and think that I need a pair for myself. Handspun, a Cthulhu dice bag, ninja stitch markers, nibbles, a nifty case for her interchangeable needle set, and a project bag with a hidden secret.

ninjaswap

Dere's a ninja in dat bag!!!

Now. I bet you want to make your own ninja-tastic bag, yeah? Ok, then. Tutorial on it in my next post (it's one of the easiest bags to make, ever). But if you want a shopping list, here goes:

1 quarter yard of outer fabric (red brocade in this case)
1 quarter yard of inner fabric (black linen in this case)
a bit of fusible interfacing (I used two scraps that were about 3 x 3 inches each)
Ribbon or cord
Thread, sewing machine, scissors, etc.

Ninja version will also require:
A scrap of off white (for the face) fabric
Two safety eyes.

See you then!

Tuesday, May 31, 2011

Almost there...

Oh wow.

It's sunny. And WARM. I can't help but hope that summer is actually here. Oh course, it's perfect weather to finish up something massive and wooly.


A thank you gift for Mr. Munchkin's teacher. She's been beyond phenomenal, and this Gap-tastic cowl is just part of the homemade gifts that we'll be giving her. Excuse my crappy hair styling, I'm not really sure what to do with it these days.

Since the weather's been so rotten, I've been hiding in my sewing room. Lots of project bags (gifts for my fellow Odd Duck mods!).


Simple linen drawstring bags, filled with some wonderful stuff. That will have to stay a surprise for a bit longer, as I'm not mailing anything until the Canada Post strike is over. *sigh*

Also. The Viking Project is almost complete. For Mr. Munchkin - I just need to hem his pants. For Ms. E - her dress is done! And for Mr. Ninja - Tunic and pants are complete. As for myself...well. Things are not going swimmingly.

So, I finished my dress. And decided that I didn't like the beige. Purple was mentioned at the dinner table as a nice option. I pulled out my Procion dyes and set to work. What I didn't anticipate was how trashed the dress would get in the washing machine.


GAH.

...

At least it looks lived in, eh?

Luckily, I needed to shorten the sleeves anyway, so I should be ok. However, if you hear wailing and gnashing of teeth coming from Dartmouth way...it's probably me. Send chocolate, please.

Tuesday, May 17, 2011

The Viking Project - Day 2

Well, technically...it's been a whole lotta days. But for consistency's sake, let's just stick with the format.

So, on the second day, I wanted to finish off Mr. Munchkin's pants. Hoping to be authentic, I worked from a fairly well researched SCA handout on men's clothing. All that I had to work with was a sketch of a pair of pants found in a Danish peat bog in Thorsbjerg.

I must say, I do like things from Denmark.

Lego.

Bang and Olufsen sound systems.

Viggo Mortensen.


Anyway, back to the sewing. Winging it, I cut out what I thought would approximate the pieces.

VikingProject2
And proceeded with one hell of a jigsaw puzzle.

VikingProject2
The resulting pants are ... serviceable. Not ideal, but they'll work. With copious amounts of elastic and a very strong drawstring.

Next, a little dress for a little maiden.

As I've been working away on these projects, I'm finding myself far more willing to toss period accuracy out the window. (The pants might have had something to do with that.) So for Miss E's dress, I made a T-shape dress, but with square gores. As you can see, the pieces to the left of the body show what the finished sleeve and gore look like, and the pieces to the right show what they look like when initially cut out.

VikingProject2

Like the tunic and pants for Mr. Munchkin, it's all sewn up and awaiting trim application and hemming. I'll post pics of the kids in their outfits once they're all completed and ready for the big reveal.

Next, my outfit.

To be honest, what I had been imagining just did NOT work out. As Mr. Ninja said, "It looks like you had your bodice ripped." So. You're not getting pics of the original concept. But the good thing is that I managed to salvage a cute summer dress out of it.

Using this tutorial, and lengthening it to a good size for a dress, I cut into the most wonderful heavy linen I've ever worked with.

VikingProject2

The resulting dress looked rather like a paper bag. So, I sewed a casing onto the waistline and ran a ribbon through, providing some minimal shaping. And since I kept losing the ends of the ribbon in the casing, I tied on some cloisonne beads. Snagging a detail from a dress pattern that I helped Ms. Happy with this weekend, I ran a thicker ribbon through the casings at the top of the dress, tying it together in a sweet little bow.

VikingProject2

Here's hoping that the next attempt at my outfit is a little more successful.

Wednesday, May 4, 2011

The Viking Project - Day 1

Much thought and pontification has gone into this project already.

The sheer amount of research has been a wonderful time suck, as I have learned copious amounts about what, where and how Vikings dressed themselves. While part of this research stemmed from sheer curiousity, I figure that some of it will come into play when I'm writing. So. Multi-tasking FTW!

Here's a little background into men's clothing of the Viking Era for you, as that's what I'm going to start sewing first.

What we know about Viking clothing mostly comes from images carved into runestones, jewellery, and descriptions in the Sagas. Occasionally, tiny scraps of material are found in burials - typically preserved underneath metal such as brooches or buckles. From these scraps, archeologists are able to see what kind of weave patterns were used, and sometimes even what kind of materials the clothes were made of.

Men wore an undertunic, typically made from coarse linen. Wealthier men had ones made out of silk, but these were quite rare. Over the tunic went a woolen overtunic, typically dyed and spun by the women of the household. Pants were also made from homespun wool.

Now, for my purposes - wool is right out of the question. First of all, it's bloody hot during the season that we'll be sporting the outfits. Also, wool is bulky. I have no desire to tote around big bulky wooly garments for the one or two days that they'll be useful.

So, I'm not being entirely accurate and am using very heavy, roughspun linen for the outfits. I'm making simple T tunics with gussets for the underarms and to provide some fullness at the bottom of the tunic. Pants will also be simple - drawstrings and possibly modern cut, as opposed to historically accurate gusseted pants. (What can I say, I'm both lazy and practical.)

First up is Mr. Munchkin's tunic top.


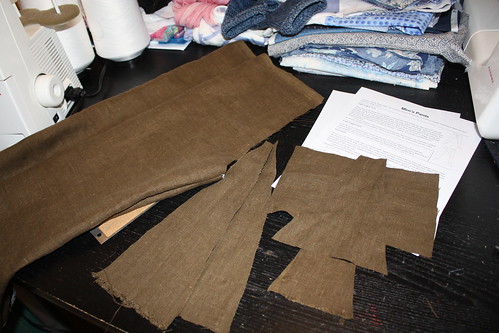
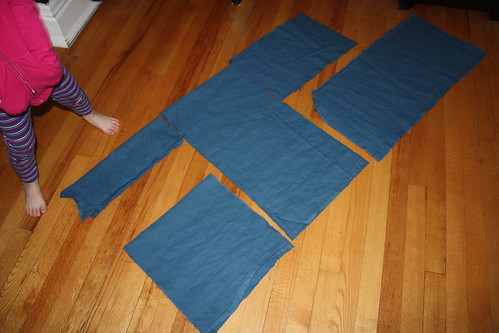
Here you can see the pieces all cut out. There is a long rectangle that is double the measurement from his shoulder to the bottom of the tunic, and the width from one shoulder to the other. In his case, the rectangle is approximately 50 inches long and 20 inches wide.

The four triangles are for the underarm gussets, and also the gussets that flare from the waist out to the bottom of the tunic, providing some fullness.

So let's get sewing!


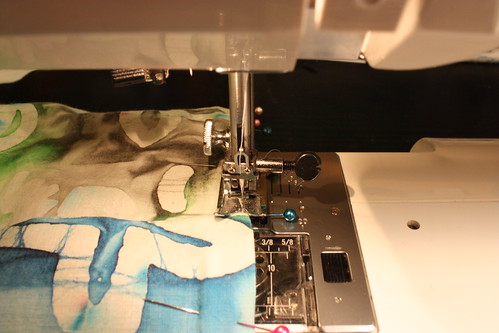
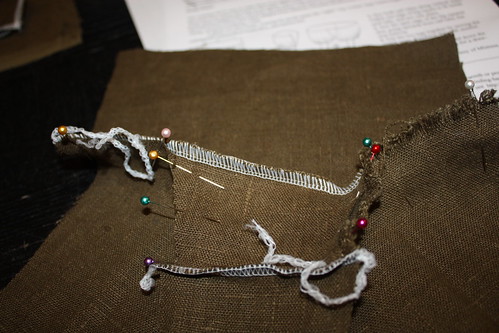
I pinned the first triangle to one edge of the sleeve, right sides together. Sewed them together, then pinned the other side of the triangle to the other side of the sleeve and repeated.


But this time, I continued sewing the sleeve together all the way down. Oh, I nearly forgot - the gusset provides room for the arm to move, but the sleeve is meant to fit tightly around the wrist. So, the rectangle that makes up the main body of the sleeve measures the length of Mr. Munchkin's arm (from shoulder to wrist), and is the width of his fist (measured around to ensure that he can get his hand through.

Repeat for the other sleeve.

Next comes the insetting of the sleeve. Being the lazy slapdash crafter that I am, I decided to insert the gussets for the bottom of the tunic at the same time.

Flipped the sleeve so that it matched to the right side of the tunic, then smushed it inside the top of the folded-over rectangle. Pinned with lots and lots of pointy objects. Made sure that the sleeve is centred so that it's aligned with the top of the tunic body.


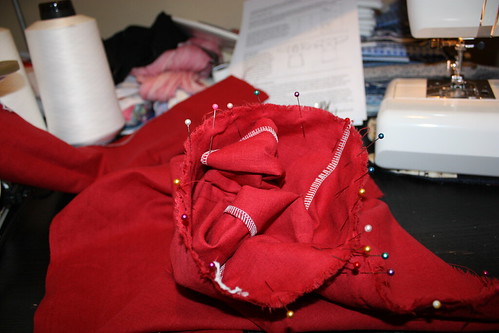
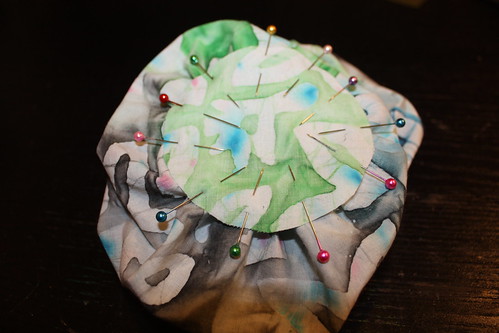
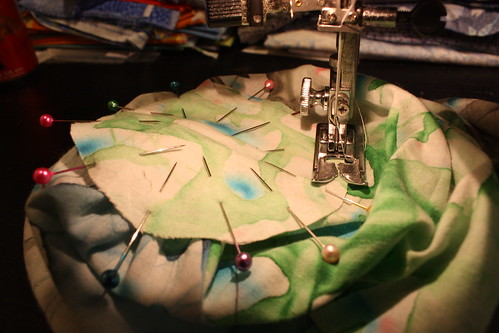
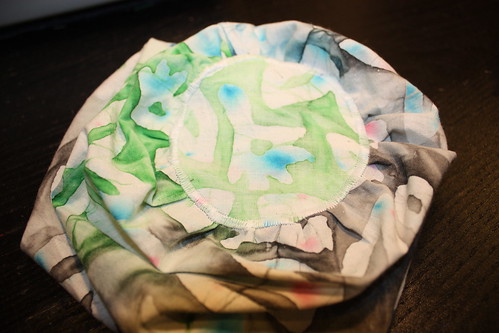
Pinned and moved onto inserting the lower gussets. It's not hard, it's done exactly the same way as the gussets for the sleeves. Only difference is that both sides are pinned into place before anything gets sewed down.


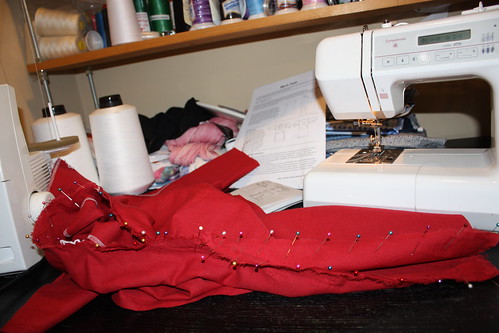
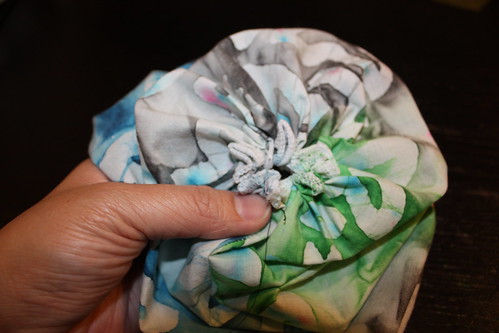
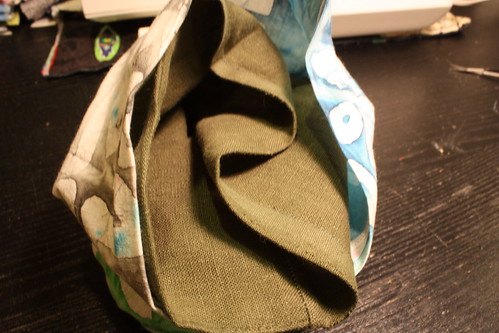
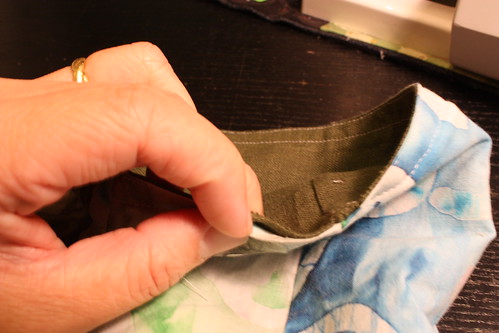
Sewed all of the pinned seams, then turned the entire thing right side out. Repeated for the other side of the tunic. Next came the neckhole. Since I'm still on the hunt for the right trim to edge the tunics with, this part is a little rougher than usual.


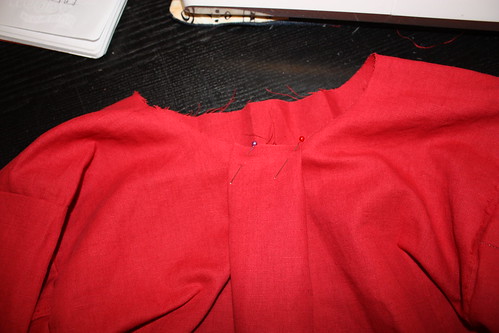
I eyeballed it, honestly. Measured in about 4 inches from each shoulder seam and cut. Of course, it was too large. Ugh. So, a small pleat in the back helped rectify that problem. A quick stay stitch and the collar is now prepped for the application of the trim.

The tunic still needs to be hemmed and the sleeves adjusted, but that can wait a little bit, just in case Mr. Munchkin decides to go on a growth spurt between now and the summer.

Pants are next on the menu, but those are a quick job once they're cut out. Y'know, I just might actually pull this off. (Yes, I'm feeling a bit cocky. I think I've earned it, people.)